
About
All feedback (714)
- electricmilesllc (855)- Feedback left by buyer.More than a year agoVerified purchaseThank You For Your Purchase! - Electric Miles LLC.
- tatdem-10 (1420)- Feedback left by buyer.More than a year agoVerified purchaseGood buyer, prompt payment, valued customer, highly recommended.
- cascadeclear (6867)- Feedback left by buyer.More than a year agoVerified purchaseGood buyer, prompt payment, valued customer, highly recommended.
- star-cycle (104442)- Feedback left by buyer.More than a year agoVerified purchasePrompt payment received smooth transaction perfectamundo !
- leo_importadora (1841)- Feedback left by buyer.More than a year agoVerified purchaseGreat communication. A pleasure to do business with.
- honda12t20 (70231)- Feedback left by buyer.More than a year agoVerified purchasePayment came so fast we had to duck! Highly recommend, will do business anytime!
Reviews (4)

Nov 28, 2018
Perfectly fine stand if you know what you’re doing.
Got my stand in and assembled it in about 5 minutes. You need a 6mm hex and a 15mm box end. There’s no real assembly instructions but here’s the basics. The 4 big nuts go on the feet, then the feet thread into the base. Take your uprights, and put them so the rollers face each other. Then the hex bolts go top down. On the bottom of those hex bolts, you put your flat washer, then a lock washer, then the nut. When you tighten this, pull the upright toward the edge of the base and tighten it. Your axle shaft now fits perfectly. You need a 4mm hex to tighten the spindle on to the axle shaft. Make sure the bubble level is perfect before you try to balance a wheel. There are lots of YouTube videos on how to balance. I use motion pro steel weights, and cover them with black duct tape on black wheels. I can get my track bike wheel within 1/16 oz with this stand following these instructions. You can too. This isn’t rocket surgery and this stand was $5 cheaper than my local shop charges to mount and balance 1 tire, so it’s paid for itself with 1 set.
Feb 28, 2019
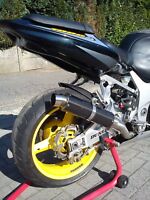
Awesome sound, complete kit
I got this for a gsxr 600 that I replaced the stock header, for a 1k header. I needed a can that was affordable and would be a simple bolt on. This completely fit the bill. I was able to do a complete exhaust, with a titanium header for $250. Less than a used, beat up yosh can alone. The stainless quality on this, and the mid pipe is really good. No complaints about anything at all on this, with exception of the strap. The strap does fit, but the rubber and getting the protective plastic off was a pain in the ass. It could be a little thicker and better quality. Better yet, give me an option for a brushed strap in stainless that matches. All in all, for the price and quality, you can’t beat this kit. I mean it’s a short can, it’s gonna be loud. Sounds awesome at 14k rpm, looks good, what more could you want?

May 08, 2018
Anet A8, still a good buy?
4 of 4 found this helpful I say yes. This is my 3rd printer, having an older i3 clone with the smaller build area, and a prebuilt, I decided to on getting the A8 instead of upgrading my i3. First, there were a couple issues in putting this together. I had several (12) of the m3 nuts that the threads just weren’t right. So this extended my build time, checking them before putting into the frame and messing with trying to get the screws started. I picked up a bag of 100 for $5 off amazon just in case. Second, the instructions included on the sd card are confusing. Look up A8 build on YouTube. It’s by Jimmy something or another. It’s a 3 part video. Follow that and you’ll have no issues. Last, when you level the Z axis, you need a metric measure. You can get away with using the included screw driver or something as long as the blocks are dead even. If not, it will screw up your bed leveling. Lastly, the kit calls for wood screws to hold the limit switches. There are 2 sets. One had a counter sunk head, the other was not. The counter sunk screws would not properly thread so I used the round top screws instead.
Take your time with zero and bed leveling. It needs to be perfect when printing without a raft. Also the masking tape on the heated bed is a joke. Plan on getting either glass, or PEI. I suggest both. PEI on top of glass. The aluminum build plate will not be perfectly flat like glass will. Also, the older A8 had threads on the trolley plate and used nuts to hold the screws when leveling. The one I got did not have threads and you just use the wing nuts to zero. This is good as-is and allows you to set the zero height with the glass and PEI clipped in place. You can get 220x220 now to cover your whole build surface and still zero without moving it, or ordering 200x200 to have access to the screw heads. I do recommend watching the videos on how to add the separate mosfets for your hot end and heated build plate. Some of the concerns about the controller running power through are valid. If you do power off the controller, hold the power blocks in place when screwing the connectors down. This is still an issue where the sockets for the hot end and build plate are not indexed to the board. You can and will twist them when tightening the terminals.
With those minimal issues, I have been able to get really good prints with minimal calibration so far. I still need to calibrate the temps and feed rates for the filament I’m using but out of the box, and default cura settings did a fine job.