
About
I am on a quest to save the planet of e-waste, one device at a time. The products I offer are of the highest quality and value. I ship immediately upon receipt of your order. Thank you kindly for your business!
All feedback (1,329)
- vitcom2015 (50529)- Feedback left by buyer.More than a year agoVerified purchaseQuick response and fast payment. Perfect! THANKS!!
- yywirelesss (153309)- Feedback left by buyer.More than a year agoVerified purchaseGood buyer, prompt payment, valued customer, highly recommended.
- pro-distributing (46389)- Feedback left by buyer.More than a year agoVerified purchaseThank you for an easy, pleasant transaction. Excellent buyer. A++++++.
- encorecorp (102209)- Feedback left by buyer.More than a year agoVerified purchaseA+ Buyer!!!
- anker_outlet_store (51474)- Feedback left by buyer.More than a year agoVerified purchaseQuick response and fast payment. Perfect! THANKS!!
- digitalageny (2586)- Feedback left by buyer.More than a year agoVerified purchaseCorrespondence was good. Exceptionally pleased.
Reviews (8)
May 14, 2017
High Quality with Good Adhesion!
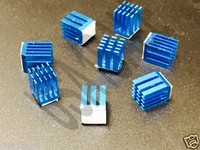
1 of 1 found this helpful Before I have a RAM or GPU failure on the system I just rebuilt, I thought it wise to add a little extra insurance. I have used them before with kits, but did not know where to buy extras until now. They are very light weight and adhere to the memory modules very well on the GPU. When the aluminum heat spreaders arrive for the RAM, I intend to use 3 per card on the exposed edge where the cards overlap horizontally.

Nov 14, 2017
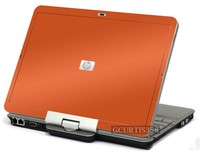
Case Badges are Important
Case badges are an important part of refurbishing equipment for resale. When I receive an HP laptop at auction to refurbish I usually know in advance what improvements I am going to make on the device. If the CPU or GPU are not soldered to the board, they are taken into consideration for an upgrade, as well as other components such as increasing the RAM or changing an HDD to SDD. Whatever upgrades I make to the unit, I always look for the case badge that represents the product "Inside", and it speaks for itself when I go to photograph the device on completion.
To remove and old badge, a blow dryer or hair dryer works the best to loosen the glue for easy removal. It leaves a residual glue behind that the bulk of can be rolled up with the finger. The rest can be removed with "GooGone" followed by glass cleaner and a paper towel or soft cloth.
The adhere a new badge, a clean warm surface works the best as well. As you peel the waxed paper away from the badge try not to touch the glue side at all. I like to remove half of the wax paper and fold it down a little to aid in the alignment on the case. Again, with a blow drier warm the surface of the device to soften the glue when it touches the surface of the device. That will give you the best adhesion when it cools. In situations when the badge may have lost its adhesiveness, try warming it too to rejuvenate the adhesive before applying it to the surface. Thanks for reading!
May 03, 2017
Follow the Directions!
The installation will be clean and simple if you follow the directions provided. Water and computers do not get along, but you have to use a bunch of liquid to float it into place. From my experience with these skins, Windex or any other glass clean works the best, because it evaporates quickly once you push it out from under the skin. If any glass cleaner happens to get under the computer casing, it will evaporate quickly before it does any harm. Best advice is to remove any dust specks you see after cleaning the top, because a tiny bubble will show where that speck of dust is and it cannot be worked out. Good luck!